
As promised some days ago, here is the followup to the minimal arduino post. I share the arduino code used in controlling a znet 2.5/xbee series 2 network, as well as the schematics for the controller itself.
Controlling a xbee network using an arduino
December 12, 2008 — hcgiljewind-up bird(s)
September 4, 2008 — hcgilje
Introducing a new species, the wind-up birds.
The wind-up birds are a flock of mechanical woodpeckers, having found their first home in a forest in Lillehammer, Norway as part of the UT-21 project.
How will nature treat them, with hostillity or acceptance? How will the wind-up birds adapt to heat/cold wet/dry conditions? Will small insects creep inside the circuitry creating possible short circuits, beetles eat the wood, squirrels use the wood slit as nut storage (or the roof as a slide?), birds use it as a shelter, etc.? Will they be treated as foreign objects or accepted into the local eco-system?
How do real woodpeckers react? Are they threatened, attracted, or not bothered? Will they use the roof as a pecking drum?
Initial tests indicate an attraction: it took 15 minutes for a real woodpecker to join a wind-up bird on the same tree.
Adding a layer to the perceived reality:
The sound of the wind-up birds easily fool humans. The initial reaction is surprise, and then bewilderment, as there seems to be a whole flock of birds communicating. Then the curiosity of trying to track them down, to localize the sound, becoming more aware of the surroundings, sharpening the senses.
This was the initial motivation for me, the movement of sound in a space, and the effort involved in trying to localize the source of the sounds which lead to a stimulation of our perceptive apparatus.
By introducing an element or layer which somehow relates to the environment, but still is a bit off (It is very unlikely to hear a flock of woodpeckers drumming at the same time, and it is usually restricted to the mating season in the spring), you perceive the reality differently. This could be called an animalistic alertness, one of the three listening modes described by Barthes (Listening).
This project is related to my soundpockets project, and as with that work I feel it is somehow more interesting when people happen upon it by chance, instead of looking for a piece of art in the forest.


The development of the wind-up birds have gone through a lot of phases:
It was important for me that the sound produced was not playback of a recorded sound, but mechanically produced, so I looked at many different ways of creating resonance boxes and ended up with a construction resembling a wood block: a piece of wood with a slit. I ended up using a simple push-magnet solenoid for the mechanical part.
The first prototype was an arduino board, the solenoid and the woodblock, trying to find the right pecking frequency for the solenoid, and testing different woodblock designs.
I decided to add a roof, to protect the wood and circuitry from heavy rain.


Since the wind-up birds are communicating, they needed to be in a wireless network. I decided early to use the xbee radios which are programmable, low-energy, high speed radio modems which can work in a mesh network.
A lot of effort was put into creating and deciphering xbee datapackets to be used in the arduino/processing environment.
Energy consumption was an important factor in the project, since the wind-up birds would be in a forest with no access to electricity and should be active for a month. One strategy was to use low-power components. It´s amazing the difference between two voltage regulators for instance when they have to be on for a month(the difference in consumption was the size of the battery I ended up using for the whole project).
I also decided to use a low power version of the arduino, basically just the microcontroller chip running at half speed (which meant using a AVR programmer to program the chips).
The other important factor in reducing energy consumption was to make use of the xbee and arduino´s capability to go to sleep when inactive. I decided the wind-up birds would be pecking about every 5 minutes, and inbetween they would sleep. Also at night they would be sleeping.
After having decided upon the components to be used, I designed a prototype circuit, which was later made into a proper circuit board making it easier to mass produce the birds.
It took a lot of trial and error to get the wind-up birds alive and pecking in the lab, but I had a pretty reliable setup when I placed them in the forest. The challenge in the forest was to find interesting locations within the range of the network, and to find interesting pecking patterns. I ended up making a system where the pecking pattern is different everytime, so it wouldn´t become a simple playback of movement, but a dynamic system.
More images of the wind-up birds
thanks to Tom Igoe, Jeff Mann, Kristian Skjold and Roar Sletteland for helping me realize this project.
Here is a link to the first technical post related to the project, which covers how to program and hook up a atmega168 as a minimal arduino standalone, using the internal oscillator running at 8mhz and 3.3 volts.
video projection tool v2.1
May 29, 2008 — hcgilje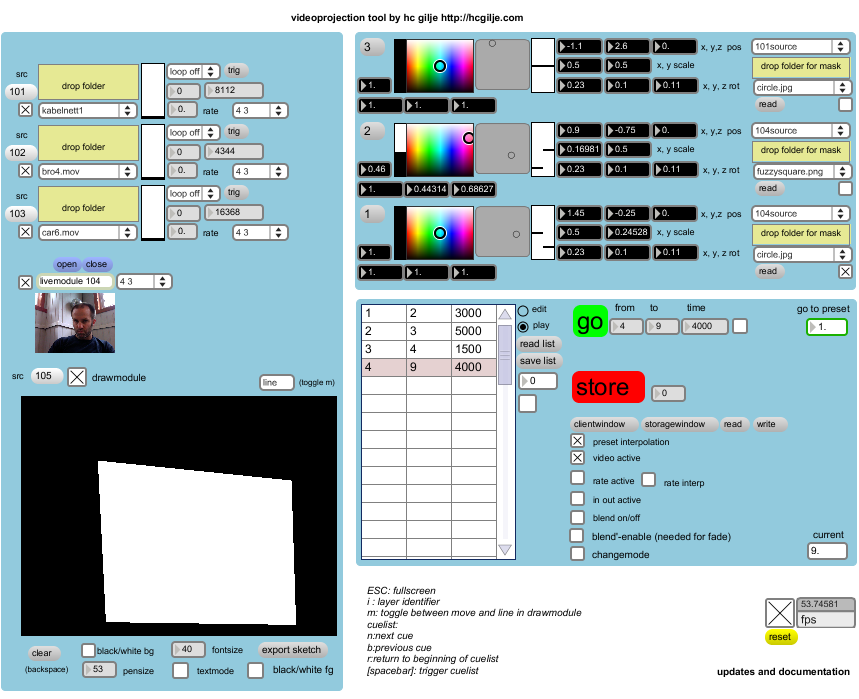
Last week I was invited to the Medialab Prado in Madrid to give both a short workshop and a presentation as part of the light,space perception sessions. The energy at the medialab was amazing, a lot of projects being worked on in parallell, and it was great to see a medialab focused on producing works, not making festivals or big exhibitions. Check out their interactivos program, a intensive two week period for developing a selected group of works, a collaboration between the artists, the workshop teachers and other collaborators who want to contribute.
I got a chance to continue working on my videoprojection tool, which is a multi-videoplane software for masking video projections and position layers on specific objects and surfaces. You can find all the information,documentation and software (osx and win xp+vista) here.
relief projection 2008
May 15, 2008 — hcgilje
relief projection lab at bit teatergarasjen by hc gilje april 2008, originally uploaded by hc gilje.
This easter I got the opportunity to work in a large theaterspace (BIT Teatergarasjen) to continue my work on relief projection (or masked projection).
I made 9 plywood boxes to use as my projection objects, and worked with two projectors, having a total of 16 projection surfaces.
One of the aims for this session was to also work with sound (each object would double as a speaker), and to create a depth in the placement of the objects.
I implemented my nodio system into the projection patch, which made it possible for me to create sequences of movement.
There are plenty of images from the session here.
Turning Bits into Atoms
February 10, 2008 — hcgilje
Object #1 – 039 Final product [s], originally uploaded by watz.
Marius Watz recently held a two week workshop as part of Club Transmediale this year: Generator 2.0 X Beyond the Screen.
“Digital fabrication (also known as “fabbing”) represents the next step in the digital revolution. After years of virtualization, with machines and atoms being replaced by bits and software, we are coming full circle. Digital technologies like rapid prototyping, laser cutting and CNC milling now produce atoms from bits, eliminating many of the limitations of industrial production processes. Once prohibitively expensive, such technologies are becoming increasingly accessible, pointing to a future where mass customization and manufacturing-on-demand may be real alternatives to mass production.”
The invited artists had some prior experience with fabbing, and from looking at the images from the workshop I wish I could have seen the resulting exhibition at [DAM] Berlin.
..and as usual a more in-depth article at WMMA.
Related:
When I visited f0am in Brussels in october they were busy constructing a reprap, a DIY rapid prototyping printer, and their ultimate goal is to use it to make food.
Connect the dots
November 10, 2007 — hcgilje 
mouselab2.jpg, originally uploaded by hc gilje.
I have been very busy preparing and giving a 2 week physical computing workshop at The Academy of Fine Arts in Bergen, “Connect the dots”. It has its own blog, with lots of useful info related to arduino, mice etc. (look for resources category). There are also images available from the workshop.
The aim was to introduce to a mixed group of students the basic concepts of physical computing, and how to to create relations between objects,spaces,actions and people, so it was both a hands on workshop with arduino (analog in/out, digital in/out, serial communication with computer), different sensors, transistors and relays controlling 12 and 220 volt appliances, discussion and presentation of other artists´ work, and the production of a one day exhibition including a listening post, a mouse radio, a paper burning machine, a weather machine and a callstation (where the arduino picks up the phone when you called a specific number ++). Read all about it in the connect the dots blog!
directional sound
July 24, 2007 — hcgilje 
May I Have Your attention, Please, originally uploaded by Mar.co.
I am doing a series of projects called soundpockets for urban interface oslo, which in different ways tries to create pockets of sound in public space. Some of the versions involve the fm sender- mp3 setup mentioned in the previous post, another one involves a directional speaker mounted on a pan/tilt unit, and this has been my second headache this summer, finding a controllable pan/tilt unit which is reasonably fast, which can handle a load of a few kilos and which is not ridiculously expensive.
Fortunately I have had good help from Soundscape studios. The first ideas was to use a existing movinghead light and refit it with the speaker, but it turned out that the motors wouldnt be able to handle the load. Pan tilt units are usually made for a specific purpose, either light or video, and the few ones which are available for general purpose use and which are controllable are very expensive.
The one we have ended up with is quite expensive, but is controlled using serial protocol, is made for outdoor use, and is powerful enough to handle video projectors (for later projects). It is also very fast, up to 300 degrees per second pan, and 60 degrees per second tilt. Hopefully it arrives next week.
The most ambitious plan is to control it using an arduino microcontroller, which will also control a serial-controllable mp3 player, the daisy, so I should be able to place sounds quite accurately in a space, and also create movements with sounds.
If time runs short I will use a macmini with max controlling the sound and pan-tilt unit over the serial port.
I have been testing two different models of directional speakers which uses ultrasound as the carrier signal, I will probably have to go for the smaller one, although I am a bit worried it will disappear in the ambient sound. It is also challenging to find the sounds which works best, and also how to deal with the sounds both coming directly from the narrow beam of the speaker but also the reflections on surfaces in the space.
The inspiration for this projects comes from when I studied in Trondheim in the 90ies, and I heard some stories about how a directional speaker had been used to cause a certain distress on a bridge over the local river: A person walking alone across the bridge suddenly hearing whispering voices. An out of tune clarinet projected into a marching band playing on the 17th of may (Norway´s national holiday).
If these stories are true or not, doesn´t really matter, it is the idea of having a private experience in a public space which intrigued me.
solar energy + fm sender + mp3 = #$!#%!
July 24, 2007 — hcgilje 
solar charger posing at helgøya, originally uploaded by hc gilje.
Summer has seen few posts, but not because of lack of activity. I have been busy researching for the upcoming urban interface oslo exhibition. One of my challenges has been to find a setup with a short-range fm sender, a mp3 player and a solarcell/battery solution that would make it possible to place this unit anywhere and leave it running. This has proven a lot harder than I would have imagined.
First, there are now so many fm senders available, and it is really hard to distinguish good from bad (90 % bad), and the reviews out there are not trustworthy. There also seems to be so many factors affecting signal strength so the same sender might appear to have a strong signal one day and a really weak one the next day. Frustrating and time consuming, and I am still checking out different modules.
I guess I should ask Raghav Mahato in India, who claims to have built a radio sender for just over 1 usd.
I knew very little about solar power solutions before this summer, and the options range from build it yourself solutions to “how to survive after a nuclear attack” systems. I looked first at relatively new products advertised as solar chargers for mobile devices like ipods, cellphones and pdas.
Most of these mobile solar chargers combines small solar panels with an internal rechargeble battery with different types of breakout plugs.
Not all of them are able to provide power while charging, which was necessary for my setup. I gave the freeloader a try as it sounded like the perfect companion for a fm sender and mp3 player, it has a 2100 mAh battery, but the results were very disappointing. I guess the current from the solar panels is just too weak to provide enough power to keep the battery charged while in use.
There are not so many other ready-made solutions, either they have a smaller capacity than the freeloader or they are just chargers (so the batteries can´t be used while they are being charged).
I am now looking at more heavy-duty solutions, 6-15W solar panels in combination with a charge controller and a lead battery, but this becomes quite expensive and heavy. And all I need is about 100-150mAh. I am still hoping for the perfect solution to pop up.
This research will also be useful when looking for selfpowered xbee solutions. They seem to have had success with a solar powered xbee system at ITP.
I managed to do a little bit of work with the Xbees a few weeks ago, finally getting the directmode (connect a input of one xbee to the output of another xbee, without using an external microcontroller) to work, and also exploring the sleep options, which means being able to keep the power used to a minimum.
I have discovered lots of interesting alternative energy websites, here are a few of them:
Results of video for stage workshop
June 13, 2007 — hcgilje 
khio workshop 09, originally uploaded by hc gilje.
I taught a one week workshop for the director-,choreography-, and scenography students at the National Academy of the Arts in Oslo last week.
My approach was to develop tools in the form of small software applications which made it very easy for the students to immediately start exploring ways of using video in a space.
We also tested out many different projection surfaces, privalite, dmx-controlled shutters, physical masks.
You can see a slideshow of some of the results here.
And even better, you can check out two of the applications I made (built using maxmsp and jitter), for both osX and windows. One is a simple capture program for recording either live stream, animation or recorded footage already on the camera, to your harddrive.
The other is a tool for positioning and scaling 3 planes of video, creating presets of the scenes you create and then make transitions between the scenes.
rantings from the lab
May 23, 2007 — hcgilje 
size matters, originally uploaded by hc gilje.
I have wanted to work more with the Xbee radios, but found out a few weeks ago that the ones I bought had old firmware from 2006 (even though I bought them in late march 2007).
This means that some features are not enabled, like connecting the input of one xbee to another xbee´s output (wireless) without the use of a microcontroller.
To update the Xbee´s firmware you have a few options: the expensive developer boards from maxstream, the DIY hack from Rob Faludi, or the xbee usb dongle from New Micros.
I chose the last option, because I thought it could be useful when including the xbees in a computer network for later projects. This turned out to be a very expensive solution. The dongle itself is only usd 39 which is not too bad. The problem is that New Micros doesnt specify shipping costs when you order, they just add it to your bill when it ships. I specifically asked them to send me a quote of how much the shipping would be, but they didn´t. I chose Fedex economy from the available choices, assuming it would be relatively fast and not too expensive. Well, I was wrong. They charged 71 usd for shipping and handling for a device the size of my thumb. And when I received the package I realized why it was so expensive: They shipped it in a pizza-delivery box filled with styrofoam, where the styrofoam pieces were bigger than the dongle, making it hard to even find it in the box.
Lesson learned: If placing international orders, don´t go for shops which don´t tell you the shipping costs when you place the order. Fedex, I didn´t order a pizza!
Do it the “hard” way: buy a hex inverter and follow Faludi´s tips here.
And, for uploading new firmware you need to do it from a computer with Windows.
Tomorrow I will find out if the dongle does what it is supposed to do.


